IMC UK Photo Projects
Table of Contents1. Collaboration and Skill Sharing
2. Content Issues
3. Editing the images
3.1. Selection
3.2. Crop and Blur
3.3. Resizing images
3.3.1. Linux
3.3.2. Macintosh OSX
3.3.3. Windows
4. Uploading
5. Accompanying text
6. Credit, contact and copyright
For latest uploaded images, check out the IMC UK image wire (rss feed)
1. Collaboration and Skill Sharing
Due to the nature of photography, photographers tend to be loaners, more so than people working on video or audio projects. However there is certainly scope for collaborative projects, be it a group of people in one area communication in order to ensure that events in their local area are covered at least one photographer or by coming together after an event to pool the best photos and create a photo story together.
There is also huge scope for sharing knowledge and experience in relation to getting the best from digital cameras - use of natual light, flash, fast exposures for action photography etc. How to focus on something not in the centre of your shot, how to shoot something that is backlight so that you don't end up with just a silhouette, how to take pictures in low light conditions etc. Plus loads of computer skills relating to archiving, resizing, cropping, compression etc.
To facilitate such collaboration and skill sharing you are encouraged to join the IMC-UK-PHOTO mailing list.
Other useful mailing lists include EPUK and NUJ Photo (nuj photographers only).
Additionally, the is an ImcUkPhoto wiki page set up on the indymedia documentation site which is a good place to work together on help guides or joint publications.).
2. Content Issues
When composing your picture, try to exclude any information in the scene which will be distracting to the viewer and makes it hard to understand what is going on in the picture. Keep it simple is the rule. Obviously this is not always going to be possible to do so don’t worry if you can’t.There approaches to considering what to shoot that have been long established by photojournalists. The first is just following the story in logical sequence from beginning, middle and end. Although that sounds easy it dose not make conveying the story to a viewer an easy task nor dose it help with what pictures you should take to show the beginning middle and end.
A better way is the shooting script that follows (can be used for video too):
- Establishing Shot: A high or wide view to establish the viewer of the scene
- Media Focus: focuses on one action or the main group
- Detail: A close up, one element, like a persons hands or detail of a building
- Portraits/Personality: Dramatic tight head shot or persons in their environment, the mood of the place, event or people
- Interaction: the public, police or staff. Makes for interest for the viewer
- Summery: summarizes the situation with all the key elements for the viewer Henri Cartier-Bresson called this the “Decisive Moment”
- Sequence: How to, before and after, the beginning middle and end = Actions
- Closer: Also known as a clincher; one image that would end/sums up the story
How you interpret the topics is really down to you, but you can try applying some thought to the sort of images you might want to get in situations like a protest, a new building construction, an act of environmental devastation or how you would cover the plight of travellers/homeless.
A variety of angles will also make for better visual layout, when shooting the establishing shot, shoot from low to the ground from high up and from left and right of the scene. This adds visual variety and can be extended to the other “script headings.” You can also use the cameras zoom set at the short end (wide angle) and move close to the subject and shoot low, high, right and left. Then Zoom out to the long end standing back, and shoot low, high, right and left again. This will take 64 pictures plus sequence images, I used to take three rolls of 36 exposures (108 frames) leaving 44 images for the sequence part or 11 sequences with eight different views. So make sure you have enough film or memory card.
Images for features should be iconic as on Indymedia a small image is used to accompany text and links so it should be simple and clear as to what it is for example an image of protesters would be hard to make out due to its size and a shot of a banner might be more suitable.
3. Editing the images
3.1. Selection
Ok, so you might have over a hundred images, but don’t publish them all. First sort out those that are poorly exposed, out of focus or obscured at the last minute as some one got in the way. Now go through the script and find the best image of each topic and the best images of the sequence and you should have no more than twenty images.
3.2. Crop and Blur
Photo often also benefit from being cropped for better composition (something which these multiple mega pixel photos really lend themselves to when being resized anyway).Another essential skill for indymedia photographers is how to obscure faces if appropriate.
3.3. Resizing Images
Digital cameras are producing ever bigger pictures, both physically and in file size. This means that without a bit of attention they can appear way too big on a webpage, and take a long while to appear, especially for modem users.
To get around this, they need to both resized and compressed. This can often be done with the software than comes with the camera, but there are so many variations it's difficult to give instructions. So here are methods using free software for Linux, Macintosh (OSX) and Windows.
A good size for web image uploads is 600 pixels wide with a max height of perhaps 400. You might want to make them as small as 400 wide to reduce the chance of somebody stealing them for print publication without your permission.
.jpg is the obvious first choice for file format with compress set at about 7 (70%) for a good compromise between file size an quality. Using an even lower figure would reduce the chance of your images being stolen.
The indymedia server could potentially resize for you but it would generally be a bad idea to let it as you'd still be uploading very large files for no good reason. Better to crop and resize yourself on your local machine if possible to avoid wasting time uploading and to get more control on the end result. Having said that, there are situations when you don't have the luxury of having software available to work on images before uploading, such as when using an internet cafe. In these situations you might want to consider using online resizing tools, some of which also allow cropping.
Here are a couple you might want to try...
3.3.1. Linux
Using The GIMP
source: GIMP.org
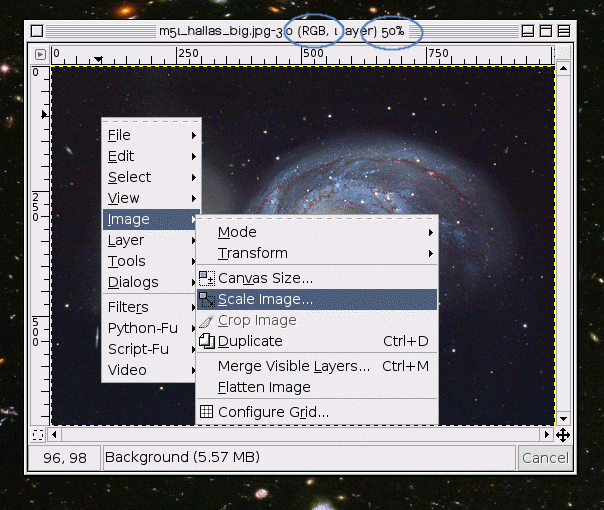
The first thing that you might notice is that The GIMP opens the image at a logical size for viewing. So, if your image is really big, it will display it zoomed out until it fits nicely. You can tell if The GIMP has done this by the percentage number in the title bar (you can click on the little screenshot to see the full view of the screenshot). Just because it looks right in this "View" doesn't mean anything!
The other thing to look at in the titlebar is the mode. If it says RGB in the title bar, you are fine. If it says Indexed or grayscale there, you should read the change the mode guide.
Image entry in the menu and the-sub menu from the screenshot should reveal itself. Click on "Scale Image...". Whenever you click an option from the menu that has ... behind it, expect another dialog. This time, you should get the "Scale Image Dialog".
If you have a desired width, put it in the dialog at the top where it says "New Width". If you don't have such a number in mind, you can use The GIMP's templates (e.g. 640x480 pxls) or use The GIMP's default image size, which is 256 pixels.
Perhaps you want your image to look more like a 4x6 inch photo on most image rendering web browsers. Simply switch the units to "inches" and put 4 inches in the height box (opting for smaller than 4x6 rather than bigger).
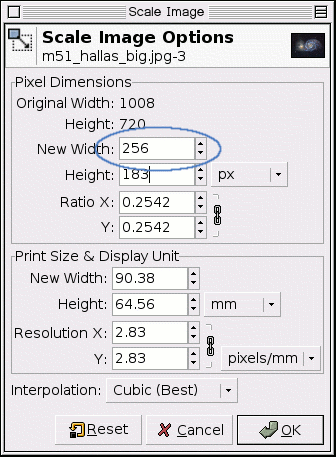
Let The GIMP choose the other dimension length for you. Meaning, it will take more image knowledge to change both width and height and have it look correct. So only change one and let The GIMP change the rest. To change the other length see the crop guide.
3.3.2. Macintosh OSX
Most Macs running OSX come with a copy of iPhoto, and if you use this already then you need no advice, other than to select Share ->Export and set the scale of the images to no more than 500 pixels width (for landscape format pictures) or 400 pixels width (for portrait format pictures).
If your file is not already a "jpeg" or "jpg" file then select JPG in the 'Format" drop down menu.
A better way, since you have the chance to compress and rename the file, as well as resize it is to use iResize, a free application you can get here iResize
Here's a quick-start guide - you may want to adapt this with experience:
- Create a new folder on your desktop called, say, IMC
- Launch iResize
- Drag and drop a picture into the large window with the red line at top.
- Change 'New size in pixels' to 500. If it's wider than it is high, select 'Width', otherwise select 'Height'
- Give your picture a new name (This will be helpful when you come to publish it) and save it to your IMC folder.
- Repeat with further pictures.
This will compress your pictures as well as resizing them, making them appear more quickly on indymedia, and is good for most pictures.
If you find there are 'artefacts' - strange blurry lines round things like type - then you can re-do the picture using the 'Options' button in the 'Save' panel. Simply increase the Quality slider to 'High' and save it again. (Double click the new image to check it in Preview).
Try never to use 'Best'. It won't look any better on the website and your article will take ages to appear.
3.3.3. Windows
Download and install Photofiltre from: PhotoFiltre
This brilliant and easy to use free photo editing software is able to quickly edit and enhance digital photos. It is also quite small and therefore a quicker download than other programs (1.6 meg).
Once installed, load each of your selected pictures into photofiltre. The Open File dialog allows one to preview each pic before loading and usefully displays vitals like dimensions, filesize, creation time etc. Any picture file larger than 100KB or so will need to be resized.
First rotate any sideways on pictures by clicking Image/Rotate.
Next you can try auto improving too light or too dark pics by clicking Adjust/ Auto levels... or Gamma correct.
If you make a mistake with any of these operations then you can always revert to how it was before by clicking Edit/Undo.
The last step should be to resize large photos by clicking Image/Image size and typing a number 400 - 640 into the horizontal pixels box. Never increase the size of an already small pic - it will look awful!
It is then recommended to "Save as" the completed picture with a meaningful filename. BIGREDBANNER.JPG will be far easier to identify than DSC28309.JPG. Doing this will make it much easier to select and upload your chosen pictures in the correct order and without duplicating any on the upload page.
4. Uploading
You can upload via the normal publish form available or by using an FTP client then publishing and article and linking the uploaded photos to it.
You should also be able to publish your photos direct from the street by sending an MMS message to our special imobile gateway. (coming soon)
5. Accompanying text
There is little point in just uploading photos to indymedia without context so you should always include some background text. Follow the same format as writing any indymedia news report - answering the 6 W’s who what when where why and hoW.
You could attempt to use the photo captions to provide this information.
- Establishing shot: When, Where
- Media Focus: Why
- Detail: What is the main issue/s
- Portraits/Personality: who is protesting against who, quotes- from who
- Interaction: What did who/they do
- Summery: what was the outcome
- Sequence: hoW did they do it
- Closer: What next. What can the reader do.
6. Credit, contact and copyright
It's always good to provide an email address with any uploaded photos so that people can can contact you for high res copies or enquire about other images you might have captured around the same time. Such inquires might be press seeking to publish your photo or people seeking evidence for legal purposes.
Other issues to consider are copyright, rights grabs and the use of corporate web services such as Flikr and Ringo etc.
Also, check out the EPUK Fair Play for Citizen Journalists Campaign
http://www.epuk.org/Resources/205/the-epuk-fair-play-for-citizen-journalists-campaign
imc, 30.09.2005 13:58